Hey there Sea Changers and welcome to my series of affiliate marketing 101 how tos as we explore how to add images to a blog post. We all know the old saying- A picture paints a thousand words – and when it comes to affiliate marketing and blogging, this cannot be more true.

Afterall – we can write all we like about a particular product but a simple picture of it in use can really push interest to another level. Furthermore, an image of you as the reviewer using the product can provide any necessary authority as well.
So, if adding images is something that you are wondering about, or need some help with, read on…
- Choose High-Quality and Relevant Images
- Optimize Your Images
- Configure for SEO
- Consider Image Placement
- Adding the Image to A Blog Post
How To Add Images To A Blog Post
As you have probably guessed, adding images to blog posts is more than simply taking a photo and pasting it into your editor. In fact, that is the easy part.
So here I will take you through everything you need to know and understand about adding images to a blog post.
1. Choose High-Quality and Relevant Images
This first part is the most important and where you need to really pay the most attention. In the simplest of terms then, you need to ensure that the images you use are high-quality and relevant to the content of your blog post.
The biggest mistake that many new bloggers make is adding images that don't really match the content. And just because it matches the niche, doesn't always mean it matches the blog post either.
For example, say your site is about dog grooming and you are reviewing a pair of dog clippers. A stock photo of kids playing with a dog whilst discussing the specs of the clipper is close, but may or may not not really resonate with a reader thinking of purchasing that particular brand.
Additionally, the images must also be on “high quality” (we will elaborate on this later) and these create a positive user experience and keep visitors engaged with your content. Avoid:
- Blurry or pixelated images
- Badly cropped images, overexposure, or underexposure
- Images with cluttered backgrounds that distract from the main subject
- Images that are over-editing with excessive contrast or unnatural colors
Where to Find High-Quality Images:
- Your Own Photos – Original images make your blog unique and authentic. They help personalize your content and make it more relatable to your audience. To be honest, if you can take a good photo and crop with well, then this should be your first port of call.
- Stock Photo Websites – Sites like Unsplash, Pexels, and Pixabay offer high-quality, royalty-free images – still, be sure to check the licensing terms before using them. Modify stock photos to make them more relevant if you can (and it is within the licensing terms) otherwise the risk here is that your image looks like every other blog on the internet.
- Custom Graphics – Tools like Canva or Adobe Express allow you to create branded graphics, infographics, or social media visuals that align with your brand identity.
If you’re using images from external sources, ensure they are properly credited according to their license.
- For Creative Commons images, provide attribution as required.
- Avoid using copyrighted images without permission. Check licensing terms before using any external images.
As I write this, more and more AI options are available that can create unique, realistic images that can really help enhance your post if you can't find a good option from the above. The trick here is to find a good creator that will be able to make something really relevant, so take your time to learn how to do this before throwing half baked AI images onto your blog roll.

2. Optimize Your Images
Once you have that perfect image, the next most important job is to optimize it for online use. We discussed above the need for high quality images. However, you must be aware of the difference between high quality and high resolution.
An image can be high resolution but still poor quality (e.g., a well-sized but poorly lit or blurry photo). Likewise, an image can be high quality but low resolution (e.g., a well-composed image that looks good at small sizes but pixelates when enlarged).
For blog posts, you need both high-quality (visually appealing) and high-resolution (sharp, scalable) images for the best user experience.
Image File Formats
The format of your image affects its quality and loading speed. Hence the best way to ensure that you can have both high quality and high resolution images all the while keeping the size small is to choose the right format. The following formats have been designed specifically for use as online media:
- JPEG – Best for photographs and images with lots of color. It provides good quality at a smaller file size.
- PNG – Best for images requiring transparency (e.g., logos, illustrations). However, PNG files are typically larger than JPEGs.
- WebP – A modern format that offers high quality with smaller file sizes compared to JPEG and PNG. WebP is increasingly supported by browsers and helps improve loading times.
Image Optimization Options
Regardless of the file format that you have used, there are some instances – such as extremely high resolution photographs etc. – where image files are still too large for online use. To assist here, there are some other optimizing options that can be undertaken to ensure fast loading speeds without sacrificing quality.
These include:
- Resize images before uploading using tools like TinyPNG or ImageOptim.
- Compress images without losing quality using WordPress plugins like Smush or ShortPixel.
- Use responsive images so they adjust to different screen sizes, ensuring the best display on mobile and desktop devices.
3. Configure for SEO
As we have discussed above, large image files slow down your website, negatively affecting user experience and SEO rankings. However, they are not the only things we can do to ensure that our websites maintain the best chances of ranking on search engines.
Image File Names
Just as you use keywords and relevant content in your blog posts, using the same behaviors when creating file names helps search engines understand what the image is about, improving your blog’s SEO.
Instead of generic names like IMG_1234.jpg, rename your files with descriptive keywords relevant to your content. Example: best-pellet-smoker-recipe.jpg is more SEO-friendly than photo1.jpg.
Alt Text
Much like Metadata for a blog post, alternative text (alt text) is a key element for images as they help search engines understand the image content. Additionally, they also help describe an image for visually impaired users which is another green tick for search engines.
Best practices for alt text:
- Be descriptive but concise (e.g., “Grilled steak on a Traeger pellet smoker”).
- Avoid using “image of” or “picture of”—just describe the content.
- Include relevant keywords naturally but avoid keyword stuffing.
Captions
Captions provide additional context for images and improve engagement. If an image needs an explanation, include a caption below it.
- Captions can summarize an image’s relevance or highlight key points related to your content.
- Ensure captions are clear and concise without being redundant.

4. Consider Image Placement
Images should enhance the readability of your blog, not disrupt it. Strategically placed images break up large blocks of text, making content more visually appealing and easier to digest. They also reinforce key points, provide visual explanations, and evoke emotions that can strengthen the message of the post.
Well-placed images, such as feature images at the top and in-content visuals to illustrate key concepts can significantly improve reader retention and click-through rates. Additionally, properly optimized images contribute to SEO, helping the post rank better in search results.
Effective image placement ensures that visuals complement the content rather than distract from it, creating a seamless and engaging reading experience. For image placement, the following tips can be helpful:
Follow these placement tips:
- Use images to illustrate key points or add value to the content.
- Align images properly (left, right, or center) to maintain a clean, professional layout.
- Avoid overloading your blog with too many images, as this can distract readers and slow down your site.
Featured Images
A featured image is the primary image associated with a blog post or webpage, typically displayed at the top of the article, on the homepage, in search engine results, and when the post is shared on social media. Additionally, it plays a role in SEO and branding, making the post more recognizable across platforms.
Choose an eye-catching, relevant image that fits your blog’s aesthetic as well as matching the content of the blog post.
5. Adding the Image to A Blog Post
Ok, so keeping all of the above in mind, the instructions below will take you through the steps to load an image into a blog post (well, this one to be honest – haha).
The image is a screen shot that I have taken as a demonstration which I will add to this site below. I am using the WordPress with a block editor. You may need to do some research into adding images to your own blog post as you follow these instructions.
- Select whatever tool you have to add an image to a blog post.

2. Select You upload option (I use the media library myself) to open the page to upload and select your image.

3. Add your relevant alt text and description.

4. Click Select and to add the image to your blog post.
Conclusion
And there you have it – how to add images to a blog post. I hope it has been helpful and as usual, please do not hesitate to comment below if you have any questions, need some advice or have any experiences to share.
Do you want further assistance with any of the above or need help to build your own affiliate website?
Are you looking for a comprehensive training platform that can give you step by step training, 24/7 support, tools to develop and host your very own website, ongoing assistance with SEO and social media and access to some of the best online marketing minds on the planet, then click on the following link to read more about Wealthy Affiliate.
Introducing Wealthy Affiliate, My #1 Recommendation for Setting Up Your Own Online Business

When I started, I knew I wanted to work online, but had absolutely no idea where to begin! You see I had watched friends of mine run a sales party to sell essential oils and someone asked if they could just sell them online?
Then, as I sat on the bus heading into my office job, I started to wonder if I could do just that, sell essential oils online.
Anything to stop having to catch this bus to and from work every day right!
The trouble was, as I mentioned above, I had no idea how to even start.
So of course I started to look around online and found all these courses! They all promised me riches then took my money but left me with no riches!
Then I stumbled across the program that didn’t promise me riches, but told me it could help me get started even with no experience!
So I did that, joined Wealthy Affiliate that was it, and the rest as they say, is history!
But it doesn’t come without work!
That is the key here! I began on their starter membership and did the training! I then joined as a member and did some more training!
Each night after work, I would do a little more, then a little more.
And to cut a long story short, after 10 months I realized I didn’t really like writing about essential oils, so I sold the site for about $2000. But I had learned so much that I started another – about fishing and camping!
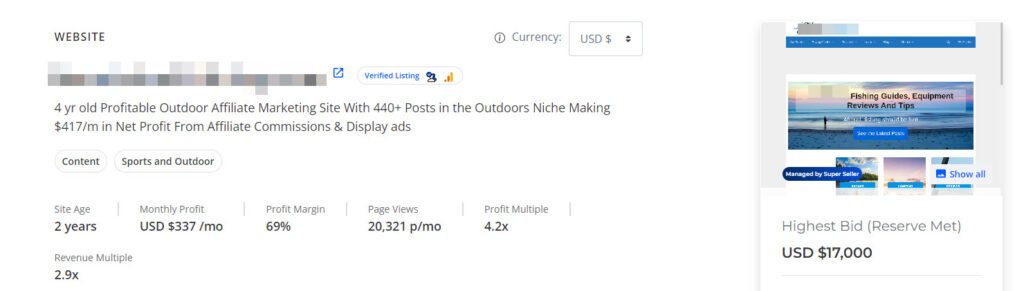
Then, after 18 months (by which time it had earned me close to $10k), I was offered $17k for the site, so I sold it too.
Now, through my travel blog, I’ve been able to fund my passion for travel and explore different places around the world.
In the past few months, I’ve been fortunate enough to travel to some amazing destinations, including Bali, Los Angeles, Dallas, Vancouver and Las Vegas.
The success of my travel blog has allowed me to fully fund my travels and explore new destinations with my family.

Try the Wealthy Affiliate as a Starter Member and Build your First Hub!
As you start your journey, Wealthy Affiliate is there for you with the most comprehensive training package I have ever seen – And as I have mentioned, I have used a few in my professional career trust me.
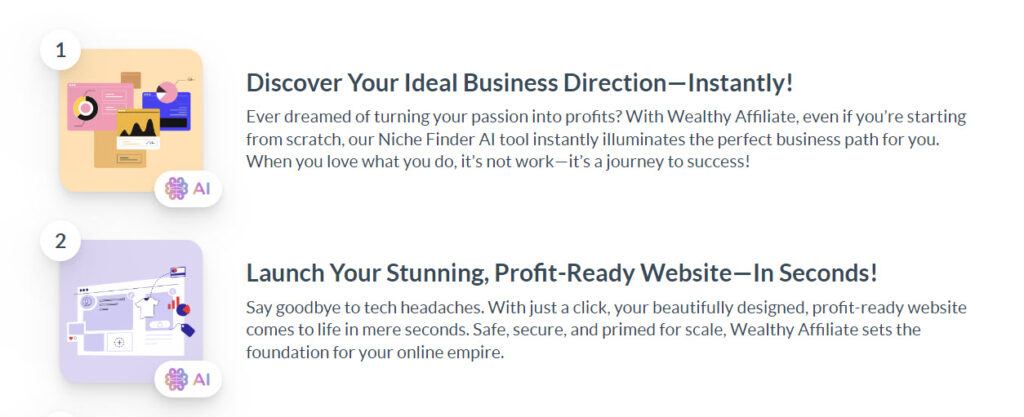
To get you started, Wealthy Affiliate has recently introduced the Hub.
The Hub
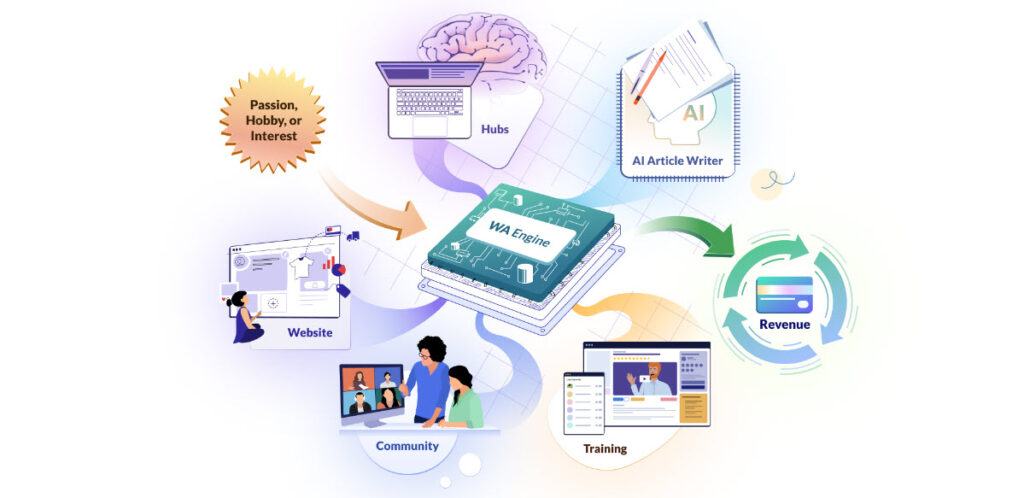
The hub is an AI based niche and website creation tool that will get you up and running with the foundation of your OWN business in just a few minutes. This includes:
- Your website – hosted and inclusive of a WordPress editor
- Your brand
- Your ‘done-for-you’ research
- Your blueprint
- A task list that is going to help you drive the creation and growth of your business moving forward.

The hub makes the website creation process simple which allows you to get started on the training with a solid base and understanding of the processes.
All you need to do is choose your subject – which is known as your ‘niche’ – and follow the steps on the screen.
Oh, and as you run through the training below you may realize that what you created above is not exactly what you want. That’s ok, you can just create a new hub!
Wealthy Affiliate Training
Then as you continue your journey, the Wealthy Affiliate Hub is there for you with the most comprehensive training package I have ever seen – And I have used a few in my professional career trust me.
Above we discussed the use of the Hub to set up a website. Once you have done this, you will be able to access the “Step-by-Step Core Training”.
This is available to all members including starter members and will give you everything you need to know to continue to create your online business.

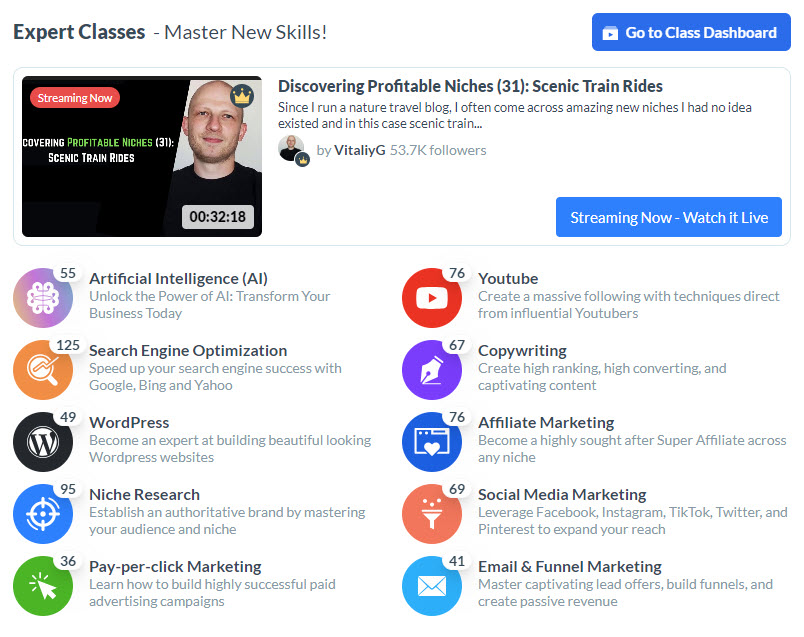
Member Training
There are also Live weekly classes taught by REAL industry experts on a range of topics like artificial intelligence (AI), SEO, YouTube, WordPress, PPC marketing and more.
Great, What Else Does Wealthy Affiliate Have To Help You?
So, let’s keep this short, Wealthy Affiliate is a one-stop-shop platform that provides:
- The Hub – this is the starting point and uses AI processes to assist you in determining your niche and creating your brand.
- Complete training programs to assist with the development of your own affiliate marketing website in your own niche.
- Website creation and publishing tools including access to WordPress editors and themes.
- AI Content article design and content creation
- Domain name purchasing (you get a free domain when you upgrade to the Premium membership).
- Website hosting, security and backup.
- Online help and chat forums.
- Weekly live training events.
- 24/7 support.
- Keyword access tools.
- SEO assistance.
The platform has been active for over 15 years with the original developers and owners, Kyle and Carson, still extremely active in its day to day operations – especially as they rollout their AI capabilities.
You Can Try it Yourself For Free
Now of course I can tell you all about how Wealthy Affiliate works (because it does) until I am blue in the face. But every other program out there – including the shams and scams – will tell you the same thing!
So how about you just try it for free yourself. The Wealthy Affiliate Starter membership is free to join and gives you access to everything you need to get started – all without the need to spend a cent!
With the starter membership, you get:
- 1 Limited Business Hub
- 1,500 AI Word Credits
- Try the AI Author Platform (BETA)
- 1 Practice Website
- Jaaxy Starter
- Limited Help & Support
- Core Niche Training (8 Classes)
And of course I will be there to help you every step of the way as well!
Look, in the interest of transparency, whilst Wealthy Affiliate does offer a free starter membership, this is designed to give you a look around, have a practice and see if it is worthwhile for you – which is a really great option.
However, as with all new businesses, you will need to make some investment so if you are serious about making money online , you will need to upgrade to a premium membership as this will give you access to all the tools you need in the one spot to succeed!
Afterall, every business needs tools to grow!
So How Much Does This Really Cost?
Wealthy Affiliate does not use upsells once you join – but as I mentioned in the video, to succeed here you will need to invest in a membership. There are a couple of options that provide access to all the tools, training and assistance that you could need – and a free domain as well.
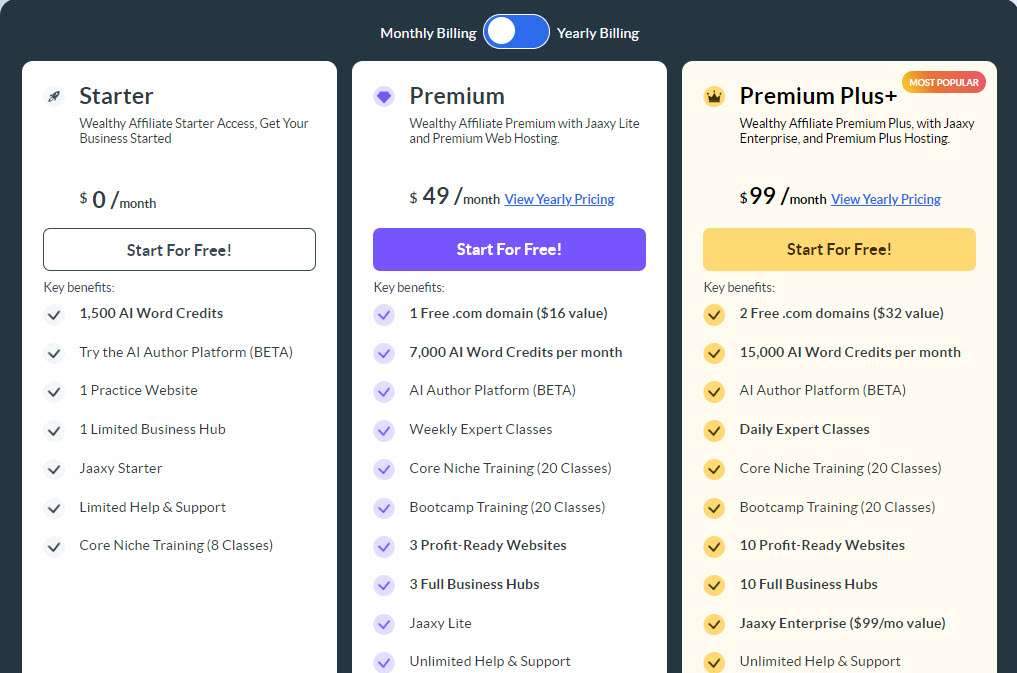
Wealthy Affiliate offers a trio of membership tiers, as detailed on their pricing page.
You can opt for the Starter membership at no cost, the Premium membership for $49 per month or the Premium Plus+ membership for $99 per month. That’s the full extent of it – and you can absolutely build your website without having to spend another cent.
You won’t encounter any unexpected additional charges or covert fees and as a Premium member, you’re equipped with all the essentials to initiate, develop and expand a thriving online enterprise.
Those who opt for the Premium membership are provided with
- Hosting for their websites
- A complimentary domain name
- Access to hundreds of hours of current expert tutorials
- Various marketing and research tools
- Personal guidance from seasoned professionals in the field
- And much much more
And for those of you who want to make a serious investment into your future, there are some yearly options as well below to give you peace of mind that you have a whole year ahead of you to get stuff done!
And Don’t Forget the Personal Coaching
Once you join, not only do you get plenty of assistance from me, but you also have access to expert coaching, support and mentorship from real industry experts.
I mean, you can have access to all of the top-tier affiliate marketing training in the world, but inevitably, questions arise, particularly during the initial stages.
With an exceptionally dynamic and engaged community that boasts over 2.7 million members, Wealthy Affiliate offers an environment where you, as a member, can fully immerse and leverage this network.
You’re never alone; you have the collective wisdom of an entire community at your fingertips, ready to assist at any moment.
Plus, there’s always-on, rapid-response website support to handle any technical queries you may encounter.
Wealthy Affiliate Works: Real Results From Real People
As I have mentioned a number of times, Wealthy Affiliate has helped me make real money online though its training and tools.

I have made money each month as well as a sale for $17,000.
But again, those promoting other programs will tell you the same thing!
So let’s get away from me and see what others are saying:
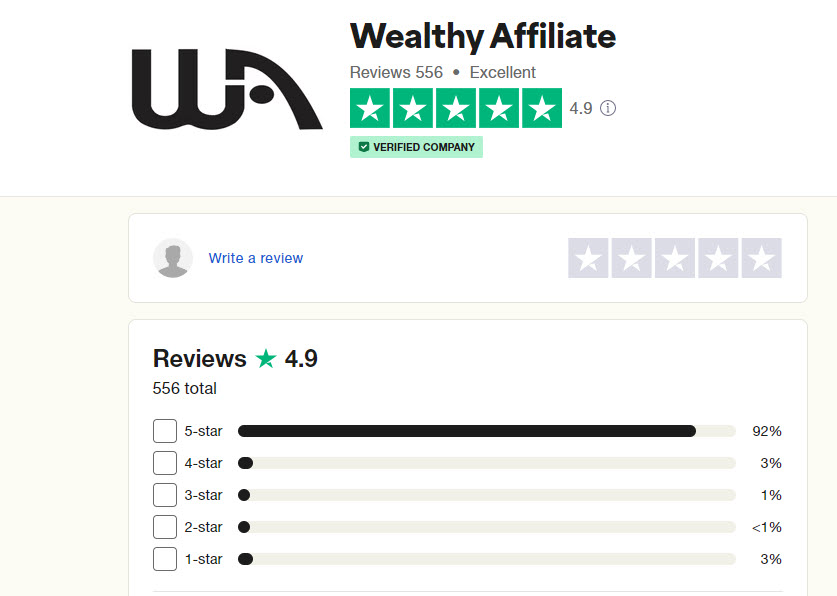
To start with, Wealthy Affiliate has a 4.9 out of 5 Star TrustPilot rating, which is a remarkable accomplishment in any industry, let alone the online business industry.
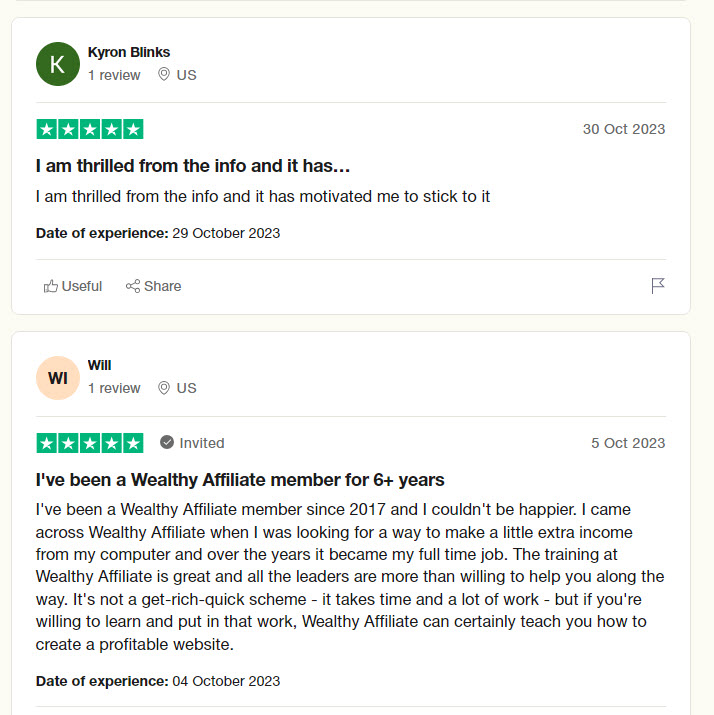
And here are some of those reviews:
And this is what people are saying within Wealthy Affiliate as well:

So, Let’s Make a Decision!
Let’s be frank, you have read this far so why not go all in, click on the button below to get started on the way to your very online business.
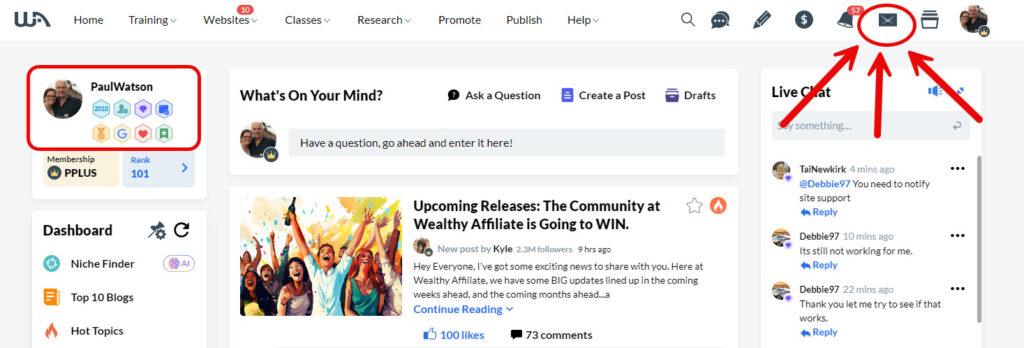
And once you are in and have had a play around with the hub, look for the little envelope on the top right and there will be a message from me. It is of course automated so respond to let me know you are there and we can start this journey together.
(oh, and the profile is mine so you can find me that way as well)
See you there
Paul


Great tips! Images really do make a huge difference in engaging readers and boosting credibility, especially in affiliate marketing. I love the idea of using personal photos with the product—it makes reviews feel more authentic and relatable. Looking forward to more helpful posts in this series!
Glad to hear it. Let me know how you go – Paul